35 or 50 mm for my DX camera?

This seems to be the most common lens question. Let us not waste any time!

What is DX?

Nikon’s first digital SLR cameras were made for professionals and used a DX-size sensor. Today, many professional cameras use the larger FX format, but DX still exists covering entry-level up to mid-range.

The FX size conforms to classic small-frame film. It is roll film, 35 mm wide. Because of the holes on each side, for sprockets to transport the film, only 24 mm remain for the image. Used for still photography, the film moves sideways. The long side for the image is defined as 36 mm. While considered small frame film then, today’s marketing of digital cameras calls the same size a full frame sensor.

The DX sensor is roughly 24×16 mm, actually a bit smaller. Another label for this size is APS-C, an uncommon consumer film format. Though so-called “APS-C” sensors are slightly smaller than the actual APS-C film frame. Marketing has the tendency to not be very precise. Again, Nikon uses its custom label “DX” instead.

The D in DX probably means digital, F in FX perhaps full frame, or just “F” as in the name for F-mount based film-SLRs, but I never saw an official explanation.

Mechanically and optically, DX cameras can use both DX and FX lenses. But not all cameras support all lens features.

First things first: What does 1:1.8 aperture mean?

Usually, someone posts two 1:1.8 lenses, a 35 mm and a 50 mm and asks which is better.

1:1.8 means the absolute aperture is 1/1.8th of the focal length. Just divide the focal length, 35 or 50 mm, by 1.8!

The  35 mm 1:1.8 lens has 19.4 mm diameter for the lens input. The 50 mm has 27.8 mm input diameter. Both results rounded to one decimal place.

We see that the 50 mm 1:1.8 lens gathers more light in absolute terms, because the diameter for the input of the lens is larger. But it also needs more light, because the magnification is higher. Think about the image taking light from a smaller area, thinning out the light in comparison. That is why the aperture is given as ratio. Ratio to the focal length, shortened as letter f.

No matter what the focal length might be, with the same aperture of “1:1.8” for both lenses, the output brightness is the same as well. The “f-stop number” omits the numerator part, it is just “1.8”.

To reduce the amount of light coming in, one can stop down using aperture blades which form a narrower entrance pupil.

Turn the lens upside down. Play with this lever and you see how changing the aperture works

Actual brightness is also impacted by loss of light within the lens. The more lens elements and simpler lens coating, the greater the internal loss of light. The technical term is “t‑stop”. Letter t for transmission of the light.

And finally, aperture blades are mechanically controlled by most lenses, which means it is not always completely precise. It can be that sometimes the real aperture is a little wider or narrower.

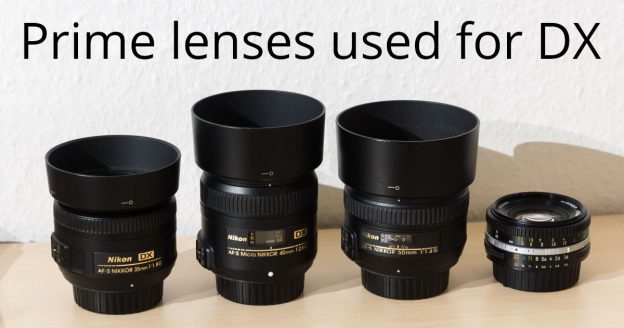
35 or 50 mm, but which lens exactly?

For 1:1.8 aperture, there are two different 50 mm and 35 mm autofocus lenses.

For 35 mm:

  • Nikkor AF-S 35 mm 1:1.8G
  • Nikkor DX AF-S 35 mm 1:1.8G

The main difference is the output area, the area of projection. The former lens can be used for film and FX sensors. Those lenses have no special designation, there is no “FX” being mentioned in the name. Of course it can be used with your DX camera, too. The 35 mm FX version (which, as just said, has no “FX” in the name) uses a more complex lens design, and is of better build quality. But it is a bit bigger and heavier, and costs a lot more than the DX version.

The DX version of the 35 mm lens only illuminates a DX sensor which is smaller in size than FX. Hence the “DX” label, so you know what you get. As side note, this particular DX 35 mm product almost projects on a film or FX sensor, but not quite. I used it once for film, but got dark corners.

If you have a DX camera, you probably want to get the DX 35 mm lens because it costs considerably less.

For 50 mm:

  • Nikkor AF 50 mm 1:1.8D
  • Nikkor AF-S 50 mm 1:1.8G

Both lenses are FX, but again these lenses can be mounted on DX cameras. There is a catch: The former lens is “AF” and only focuses on the D7000 series and above because it relies on a motor provided by the camera. On the D5000 and D3000 series, which don’t have this motor, it becomes a manual-focus lens!

The AF-S version has the motor included in the lens itself and offers autofocus on all current Nikon DSRLs. “AF” is for “auto-focus”, and “S” for silent. It is not really silent, but quieter than AF. Talk about marketing …

“D” means that the lens CPU sends the approximate focus distance to the camera which helps with flash, because flash brightness has a considerable falloff depending on the distance.

The “G” caption includes the D feature. In addition, G lenses have no aperture ring anymore. But even if you buy a lens which has an aperture ring, you would set aperture by the camera wheel instead of that lens aperture ring – unless you have a really old Nikon film SLR.

All digital SRLs and many film SLRs since 1996 don’t use the aperture ring, so you are not missing something here. If you got a lens with this ring, set the aperture to the largest f-stop number before mounting, in order to make it usable with the camera’s own aperture mechanism. The camera then automatically opens the aperture to the widest in order to meter, and to autofocus.

The AF-S 50 mm 1.8G lens is newer and uses an improved lens design. It costs a bit more than the 1.8D, but is quieter when focusing and compatible with all DSLRs and not just some.

There are even older Nikkor 50 mm 1.8 lenses, which have no auto-focus at all. I bought one used, because the manual focus feels fantastic on this one. Much smoother than on any modern lens.

But remember!

Neither of these 35 or 50 mm lenses is stabilized. Your zoom lens probably is. Unless you want to freeze motion, you can use that lens stabilization (“VR”, Vibration Reduction) for a longer exposure time in order to get enough light while the image is still sharp.

With the 35 or 50 mm lens you rely on short exposure times to avoid shake blur. In order to get enough light, you have to open the aperture. That gets you more light, too, and more background blur. You might or might not want that blur in the background. If you take a photo of two persons, both should have the same distance to the camera, or at least on of it will be blurry.

Why is 50 mm so cheap, compared?

The flange distance between mount to film or sensor is roughly 46 mm for the Nikon F‑mount. A simple lens cannot be in focus is the flange is longer than the focal length. Luckily the retrofocus design exists, allowing shorter lenses, like 35 mm, to get in focus. This requires additional lens elements.

A Nikon 50 mm lens, considering some 46 mm flange, can use a simple design instead. Or use more lens elements for better image quality. Here is what Nikon did, judged by DXOMark’s sharpness results:

  • The 50 mm 1.8 lenses, both D and G, are always FX lenses and very sharp. It makes no sense for Nikon to produce DX versions because the normal, FX-size lenses can be manufactured for a reasonable price anyway, since the design is not too complex.
  • The FX 35 mm lens is also very sharp, but correspondingly bulky and expensive.
  • The DX 35 mm lens is designed to be affordable and lightweight.

Now what?

Because I have the Nikkor 50 mm 1:1.4G version, I stopped down to 1.8 in order to simulate the 50 mm 1:1.8G lens.

But let us begin with the DX 35 mm 1.8.

Okay, good. The background is a bit blurry. If we would like to get it sharp, we would have to stop down, meaning we would use a higher f-stop number. That means to get a smaller input diameter for the lens. The smaller the input diameter, the more parallel the light rays processed by the lens, thus the sharper the focus over the frame. But decreasing the input size also means to have less light. For our experiment, we just keep the f-stop at 1.8.

Now, from the same position, the 50 mm set to 1.8.

As expected, we get some magnification. Also, the background is much more out of focus, showing noticeably more blur. What if the crop the 35 mm lens image to this frame? Let us try.

Using the right crop, field of view is the same. The depth of field is not – the longer lens, 50 mm, got us more background blur than just doing a crop on the 35 mm lens image. That means, both of these statements are true:

  • Using a longer lens results in a narrower field of view
  • Cropping an image results in a narrower field of view

But this statement is false:

  • Cropping the image increases the focal length

I like to repeat: Crop does not simply act as a multiplier for the focal length, because using an actually longer lens gets you a different image with a shallower depth of field and thus more background blur.

The trap of thinking “35 mm on DX is some 50 mm”

Let me repeat again, cropping does not impact the focal length. It still gets you a narrower field of view. A longer lens also does that, but additionally gets more background blur. There is an even more confusing misconception.

When discussing FX lenses used on a DX camera, you often read something like “on DX, 35 mm is like 50 mm”. This could make you think that depending on being the FX or DX version of a 35 mm lens, you get a different field of view on your DX camera. But that is not the case.

35 mm is 35 mm. Mounted on a DX camera, both the FX and the DX version of the 35 mm lens have the same field of view.

Before we continue, let us summarize what we learned so far:

  • The same aperture, like 1:1.8, means the same brightness regardless of focal length
  • With stopping down the aperture, we control exposure, but also the depth of field
  • To get more background blur with the same aperture, having a longer focal length helps

As alternative to a longer lens, having a wider aperture (lower f-stop number) also helps to get a blurry background. But using instead a longer lens gets you the desired background blur in a more cost efficient way. Of course, the field of view narrows as the lens gets longer.

Perspective

If we prefer to have the ability to get nice background blur, why not just take the 50 mm lens then? Because the field of view is not very wide. Outside you might be able to walk back a few steps, but inside a building you are confined. There is another reason why different lengths are important for different results. Let us first look again at the 50 mm image:

Now, we use the 35 mm lens, and to compensate its wider field of view, we walk towards the sign to get it as large as before.

Since the focus distance is now closer, the background is a bit more out of focus than we had it before with the 35 mm lens. So we learn:

  • To get good background blur, move as closely to the subject as the frame allows.

There is another observation here. The sign, photographed with the 35 mm lens, is as large as we had it when we were farther away and used the 50 mm lens. Now look at the trees in the background. They are smaller compared to the 50 mm photo. Why? When we walk towards the foreground, it gets larger more quickly than the background. The proportions change.

If we instead get the foreground larger with using a longer focal length, foreground and background are zoomed by the same rate. This makes the background appear comparatively large, meaning the apparent distance between fore- and background gets compressed.

Result: Walking closer to the subject is not the same as zooming in with the lens, or as cropping the image. The appearance of a photo is not just determined by the field of view – the position of the camera and its relative distance to the subject is very important for the overall photo!

  • “Zooming by feet” only works for the foreground. A good photo also cares about the background, even if out of focus. This means sometimes you have to first change your position to get the photo you envision – and then you might need a longer, or shorter lens to get the desired frame.

If you want to make a rather barren place look more beautiful, you might want to get farther away and then zoom in, enlarging background trees to get them big into the picture. Or if you instead want to emphasize the subject, you might instead want to zoom out and get closer, so that the foreground subject appears really prominent compared to the background.

  • The longer the focal length, the higher the magnification for the whole image, including the background. Use a longer lens and move away to enlarge the background. Use a shorter lens and move close to the subject for small background proportions.

Different lenses for different uses

Which lens is better now? Regarding build quality, the 50 mm lens feels a bit more solid. But a 35 mm design for F-mount is complicated, having an affordable 35 mm option for DX is great!

The lenses produce different images. If you put a 50 mm lens on a DX camera, it often requires you to be a bit farther way to the subject. Often farther than you would be as a naked-eye spectator. That gets you quite large background objects compared to the foreground, perhaps not looking very natural. On the other hand, it is easier to get background blur.

The 35 mm lens lets you get closer to the subject because the field of view is wider, which results in a more natural appearance of the background scale compared to the subject. In situations you cannot walk backwards as you want because the space is confined, you probably need the wider field of view more than a blurry background.

Long story short: If you can employ it, the 50 mm 1.8 lens will be very welcome. As everyday lens, the 35 mm 1.8 would serve you better because it is wider.


Selecting prime lenses for DX

With two DX cameras, a D5600 and a D7500, I use a couple of lenses and wrote about zooms already, but often prefer a fixed focal length. These are my observations, written in blog style. This is not a review trying to be balanced.

The prime DX prime: DX 35 mm 1:1.8G

Usually the questions is 35 or 50 mm? I borrowed the Nikkor 50 mm 1.8 lens several times and find it very sharp and useful for head-shoulder portraits. But I bought the DX 35 mm 1.8 lens, because it provides a field of view usable for almost anything: Travel, landscape, portraits of individuals and small groups.

The optical quality is good, but not outstanding. Especially in close range below one meter, I recommend to stop down. For focusing into the far, I also like to stop down to f/5.6 if I can, or f/2.8 if the light is low. If the light is really now, I have no worries to use the full 1.8 aperture.

Don’t just go f/1.8 mindlessly for background blur, as close-ups can appear quite soft. But for portraits, one might even want to have a sharpness “issue” in order to mitigate some small skin problems. Or when a shallow depth of field is more important than pixel-perfect 1:1 sharpness. Or when it is quite dark and one needs every bit of light.

Low-light application

The D5600 autofocus is not build for very low light, using it under these conditions can result in blurry images. I talk about dimly lit rooms at night while there is no high-contrast edge to focus on. I used the lens on a D5600 on a public Halloween party, of course without flash, and most images were sharp enough.

The D7500 performs a bit better, but a certain miss rate is still there. It takes experience to learn to use the right image part for the autofocus. The first DX 35 mm lens I got was defective, with a high misfocus rate in any light. The replacement works much better. There still seems to be a small chance of missing the focus.

The lens is not stabilized, I use a minimum shutter speed of 1/60 in low light and 1/125 during the day. I rather deal with some iso noise than shake blur.

Experimenting with settings: 1/90 s, f/2.4.

The 35 mm 1.8 lens is the all-purpose prime, and quite affordable. It does not get you perfect detail resolution but there is more to an image than sharpness. I find the rendering overall pleasing and the soft background shows a nice kind of blur (“bokeh”.)

I feel limited rather by my experience as a photographer, than by the physical limits of this lens. The lightweight construction makes it easy to carry, but it feels a bit plasticky and cheap. At least the mount is made of metal, and the lens even has an autofocus switch. This is useful especially on the D5600.

DX 40 mm Micro 1:2.8G

The shortest Nikkor Macro lens. I am not sure if alternatives exists. For macro with 40 mm, one has to get close, which allows unique perspectives. The other DX macro lens is DX 85 mm VR. Also a Nikkor 60 mm lens exists, supporting even FX. I have no experience with either of those two.

For an AF-S lens, the autofocus on the 40 mm is not very fast but the slower pace helps to get a precise focus which is important because this lens resolves a lot of detail if in focus. It allows 1:1 reproduction, meaning something 1 cm long in reality can be projected as 1 cm on the sensor. This, and the high resolution, while being compact and light, yet with a slightly more serious feel than the 35 mm 1.8, makes it my favorite DX lens.

Close-up product shot with the DX 40 mm. Taken at f/13, still only the “Nikon” label is truly in focus.

But I don’t use it as often, because the field of view is a bit too narrow – 35 mm is not much wider but enough to make a difference for me. The 35 mm lens is also more than a full stop faster.

But when the 40 mm lens can be used, it delivers sharp photos with high contrast. Images are so sharp that the bokeh is not very good until the background is really out of focus. The focal length of 40 mm projected on a DX sensor makes it excellent for portraits of all kinds. The lens has a switch to have the autofocus exclude macro range, which sometimes improves the focus speed for normal shots. In very rare cases I experience focus hunting.

The lens is too long for most architecture shots. For landscape it is somewhat useful. If the need arises, one can get extremely close, for example for macro flowers shots. For actual macro one has to get so close that the lens often shades the subject. Insects usually flee if one gets close enough for 1:1 reproduction. This is why I would not recommend the lens for macro work unless one wants to photograph motionless objects, and has control over the light. But for not-yet-macro close-ups I like the lens a lot, which includes Italian shots, meaning close-up portraits showing not much more than the eyes.

The DX 40 mm requires more experience than the 35 mm 1.8, but if applied correctly, it gets images I didn’t know were possible with a crop-sensor camera. There is a learning curve and one needs a steady hand.

50 mm 1.4G

This lens, or the 85 mm 1.8? Both are FX lenses but of course can be put on DX cameras as well. I borrowed the 85 mm several times and it is a serious bokeh machine. Images get very sharp when stopping down to 2.8. This aperture also helps with color fringes caused by chromatic aberration. Looking the cost of the 85 mm lens, I find the image quality very good. But I opted for the 50 mm 1.4 instead, because of the wider field of view.

On a DX camera, 85 mm is just too long for me. The 50 mm 1.4 lens is faster but has less background blur because it is shorter. Chromatic aberration, meaning purple and green color fringes, can be very ugly at open aperture. Stopping down helps. With f/5.6 this lens is pleasantly sharp, at least in the center. The DX image corners get softer. The much cheaper 1.8 version of the 50 mm Nikkor, stopped down to f/5.6 as well, has fully sharp corners on a DX camera.

Sharpness enthusiast would probably prefer the 1.8 version, and if you must have a lot of background blur, the 85 mm 1.8 Nikkor delivers – but the field of view of a 85 mm lens is really narrow on a DX camera.

Regarding the 50 mm 1.4, the aforementioned softness is even the least of the issues when using it wide open at f/1.4, because digital postprocessing can get a lot of the detail back. I was surprised seeing how much can be recovered. However, those color fringes cause problems which are not easily addressed in post. Those fringes don’t appear in every situation, making 1.4 usable in sometimes without color fringes.

50 mm wide open f/1.4. Taken with D5600.

This is not a pro lens providing creamy results wide open. For me personally, the 50 mm 1.4 lens is a good choice because it excels at lady portraits using f/2. The parts in focus show enough detail without being too harsh, while the other parts smoothly get softer, creating an overall pleasing appearance. The depth of field is shallow enough to get a nice blurry background. Also the bokeh quality improves with stopping down to f/2, the sharp bokeh-disk edges with 1.4 are gone.

Autofocus is the slowest of all AF-S Nikkor lenses I have, but still fast enough even for outdoor usage. Using it wide open in bad light sometimes benefits from live-view instead of viewfinder in order to nail the focus. In many cases, stopping down helps to get better images but when needed, the 1.4 f-stop is available. From experience, the t-stop also seems to be great, meaning the lens construction causes very little loss of light.

The manual focus ring has almost no play and turns quite smoothly. The lens itself feels serious.

The 50 mm 1.4 is my secret weapon for events because the results are quite different from typical cellphone shots. My photos with his lens stand out.

Bonus: 50 mm 1.8

After borrowing a 50 mm 1.8G lens several times, I feel experienced enough to comment. Even as DX camera user, you might want to get this lens. It is good for head-shoulder portraits. It can also be used on events, keeping in mind that the field of view it too narrow to get a photo of everything. But if others are there, taking cellphone shots, why redo those with your DSLR? Using a light telephoto lens with the option to get physically blurry background instead of computational blurry background, allows you to get photos your smartphone-using friends cannot. Especially on hair and other complex edges, computational bokeh can create artifacts.

A couple of cups. 50 mm 1.8 wide open. All example images in this article are straight out of camera.

Practical use of these primes

I like to use a prime lens for a full day, because it gives me a a frame. The attention then focuses on that frame. There are occasions where I need zoom flexibility and a prime lens is only a low-light backup option.

The DX 35 mm 1.8 can be used as the only lens all day long, or as low-light backup or for late-night events. The field of view is optimal to portrait one to three people.

The optical construction of a 35 mm lens for F-mount is a challenge because the flange is some 46 mm, meaning shorter lenses rely on retrofocus which complicates the design. Still getting this affordable but fast 35 mm option is great. Image resolution is good but not excellent, though looking at the size and weight, I consider it a reasonable performance.

The 40 mm 2.8 lens can be used as macro but getting 1:1 reproduction is difficult because one has to get so close that the lens hood should be taken off. As an all-purpose portrait lens it offers a nice field of view but the optics are somehow too sharp: Image parts which are slightly out of focus still try to be somewhat sharp. It takes experience to use this lens correctly, with the reward of a lot of detail in images.

If focused very close, the lowest possible f-stop number increases up to f/4.2 at 1:1 reproduction, because the inside lens-group movement causes higher f-stop. This is not an issue in practice because one has to stop down even further to get a useful depth of field. However the meter sometimes seems to overcompensate, for macro shots of moss or tree bark I usually put the exposure compensation to -1.

Zooming in on a tree bark means to enter weirdness. Taken at 1/640 s, f/11, auto-iso 7200.

For younger persons with smooth skin, this lens can do good portraits. Images can get very sharp, while added digital sharpness reveals even more detail. Resolving a lot of detail also means shake blur gets easily visible. I usually prefer faster shutter to lower iso, to avoid any shake blur.

50 mm on a DX camera is quite good for portraits, but not so good for general purpose photography because of the narrow field of view. I still find myself leaving the house with this lens mounted quite often. For travel I preferred the D5600 because it is substantially lighter. Since I dropped the camera into water, the screen no longer functions so I have to use the D7500. (Or use the D5600 without screen, which is possible, but not practical.)

For prepared portrait shootings, I tend to select the D7500 anyway, because the autofocus is a bit quicker and offers the Group-Area mode.

Using the 50 mm lens with f/2 means the fine detail is there but not in high contrast. This works well for skin. I sometimes use this effect also for objects, defying today’s trends of “microcontrast” woo woo.

FX advantages

In order to unlock the full potential of the 50 mm lens, an FX camera is needed. Vignette is quite visible at open aperture if used on a full-frame sensor, but is easily corrected in post. Corner sharpness issues on an FX image are quite visible but who cares? The center is the important part and sharp enough. Especially when using an FX sensor with common pixel count like 24 megapixels, the f/1.4 sharpness issue is less visible anyway. The tests were done using a borrowed D750,

If I had an FX camera, the compact Nikkor 50 mm 1.4 could be the only lens I need for a long time. However I am invested in the DX world.

For a true vintage look I use an AI 50 mm 1.8 pancake, with manual focus. On D5600 and D7500, there is no automatic metering. This slows me down, but makes me think before taking a photo. The manual focus ring turns very smooth. Using this pre-AF era 35-mm-film lens, when stuff was build for eternity, is an experience in itself. Do I always want to get the best possible images in the shortest amount of time, or can this be a hobby worth taking more time than technically necessary?

With fast aperture settings, the pancake AI 50 mm lens cannot compete with today’s optics. On an FX body with a lower pixel pitch than today’s DX sensors, the difference is not as visible, and the FX cameras even meter. The pancake Nikkor can be used to generate a classic photo look on digital cameras, but works best on film cameras with a split-image viewfinder.

Summary

My personal preferences seem to be inverse to the objective properties. The DX 35 mm 1.8 is a bargain lens and practical, somehow even too useful because it is too easy to get a useful composition. I recommend this lens for what it offers considering the low price, but personally don’t use it that often anymore. Sometimes I need it, like for full-length portraits in a confined space. It it also still use it for travel every now and then, with no other lens in the bag! The DX 35 mm is that versatile. And I took a lot of personal photos with it. Also the lens survived some abuse, like being dropped (two small dents in the front lens, still works but shows two small marks in bokeh disks) and heavy rain (after a day of drying, autofocus began to work again.)

On a side note, I used the DX 35 mm lens on a film camera, the Nikon F65. Though there is visible vignette in the corners especially if shooting wide open, it works good enough for me.

The DX 40 mm is more limited in its application being a little bit too long for general usage, and not as fast, and having slower autofocus. It offers 1:1 reproduction for macro, however the close range is not always practical.

But if I could keep only one DX lens, it would be this. It is sharp to begin with and stopping down reveals even more detail. It does not zoom but one can “zoom” with getting very close.

When using the 50 mm 1.4, I normally stop down, so I paid for the aperture without using it a lot. According to my tests the 50 mm 1.8 lens is optically superior when comparing the same f-stop. The 1.8 is also much cheaper, and of course smaller and lighter. But the 1.4 lens has a more serious feel and I like the overall look of the images. This is subjective of course.

The 50 mm 1.4 costs as much as the DX 35 and DX 40 mm combined. It is the fastest, but on a DX camera also the overall least useful of those three. Still, I put it on quite often.

Snap shot taken at f/2.

Recommendations?

The Nikon lineup for DX prime lenses is not very extensive, beside 35 and 40 mm there is an old 10.5 mm fisheye wide-angle, and a modern 85 mm macro, the only Nikkor DX prime lens with Vibration Reduction (VR).

Generally, Nikon does not often put VR into any prime lenses, not even the FX ones. The FX line-up compatible with DX cameras is still impressive and there are a couple of Nikkors which I would like to own – knowing I would rarely use them. And then, there are older, D-type lenses, still made, cheaper than G-lenses, and whisper “buy me to fill the prime-lens hole in your heart!” However especially for DX, many wide-angle needs can be sufficiently met with a standard zoom lens: There is not much background blur anyway, and low-light situations can be addressed with optical stabilization instead of wide apertures.

The more lenses you have, the less you use each one. This is another reason keeping me from buying more stuff for now.

Overall, I found that experimenting with a lens, see were its weak points are and what the strengths ares, and over time learn to apply it correctly, is the satisfying part.

Standard and special DX zooms

With two DX cameras, a D5600 and a D7500, I use a couple of zoom lenses. These are my observations, written in blog style. This is not a review trying to be balanced.

Inexpensive wiiide angle: DX 10-20 mm 4.5-5.6 VR

This lens got me exactly what I wanted: Ultra-wide angle in a lightweight, compact Nikkor model which is also affordable. Image quality is not optimal, one has to stop down quite a bit to get somewhat sharp images and the corners never get truly sharp. At minimum focal length, the lens has horrible vignette until again stopped down quite a bit.

The 10-20 comes with bag and lenshood, but everything feels quite plasticky. The mount is plastic, too. Strangely the barrel is pushed out at the 10 mm focal length, moving in when turning to 18 mm, and then again pushing out a little bit when set to 20 mm. This is an indication of a simple zoom design.

I am never good at selfies.

All that said, it gets the job done. The AF-P autofocus is very fast and almost silent, making the lens usable for video, especially because it is also stabilized. For many wide-angle shots I prefer stabilization to larger aperture (smaller f-stop number) because background blur is out of the question anyway, except for close-up shots. The kit-type 4.5 – 5.6 aperture allows a very lightweight construction.

A lens for every day?

When selecting the kit for the D5600 purchase I opted for this lens, knowing other Nikkor wide-angle zooms are optically superior but also much more heavier, and more expensive. With 10 mm on a DX camera, the field of view is really wide. The 2x zoom makes this lens generally usable: At 20 mm the DX field of view is comparable to a cellphone camera. It is even a bit closer. On a D7500 with the 1.3x crop mode, one gets even closer at the cost of image resolution. In-camera cropping only saves time later on, there is of course no zoom magic. Still, one can get an almost normal field of view – neither wide-angle nor tele – out of the camera without doing any further edits.

I used this lens on a film SLR! The F65 cannot focus with AF-P, so I focused to near-infinity on the DSLR and then put it on the F65. With 14 mm or more, the small-frame film (in digital terms, “full frame”) gets illuminated with acceptable vignette. Pro tip: Remove the lenshood, or you shade the long edges.

With a DX camera, one can walk around with just this lens all day long. It is not a low-light specialist but more useful in low light than you think because the short focal length combined with VR (vibration reduction, meaning optical stabilization) allows you to handhold the camera for quite some time before shake blur gets visible. With a bit of luck I can hold it for 1/6 seconds.

I have to say that the DX 10-20 mm seems to be completely useless for portraits. I never managed to get anyone looking good no matter the settings. For architecture, and with moderate focal length for landscape, I consider it a useful lens if stopped down in order to improve sharpness.

1/15 s handheld, f/5.6, 10 mm. Even with upright and some crop one gets a lot into the frame.

A lot of reach for little money: DX 70-300 mm 4.5-6.3 VR

There is a non-VR version of this lens which I would not recommend based on my experience with VR turned off. This is an in-camera setting as AF-P lenses seem to have no external switches, neither for autofocus nor for optical stabilization. With VR on and some luck, one can use full 300 mm handheld at 1/60 seconds. For best sharpness, stopping down is useful. But if light is more important, I use the lens at maximum aperture and don’t worry about some softness.

This is a kit-lens which includes the front cap but nothing else. Bag and lenshood are optional purchases (which I made), even a real lens rear-cap is optional as the box includes only a very cheap cap which cannot be fixed. The mount is all-plastic, too. Compared to larger, more expensive tele zooms, images are not as sharp.

I still like the DX 70-300 because it is is so light and compact, yet offers serious reach. The AF-P autofocus is really useful, very quick, almost no misses. In a zoo, or at a social event, I just use this lens without having to work around any focus issues.

Not even cropped. 270 mm on a DX camera.

The one big drawback is the minimum focal length. 70 mm on a DX camera is too long for general use. One has to bring another lens as well, and swap. Or bring even another camera with a different lens.

Getting the zoo tiger covering the full DX frame, that sounds quite expensive but this lens is an impressive almost-telescope. Even for faux macro photos it can be used, while the reproduction ratio is not outstanding, the background still gets very blurry and some cropping helps to get an insect large enough.

Cropped and heavily processed in post-production, still taken with the DX AF-P 70-300 mm.

I used it for a couple of portrait photos but don’t like the results very much. Having a lens his long requires me to be quite far away, which hinders communication with the model and the distance causes the face to appear quite full. While the nose is nicely small, the eyes are quite close together. I prefer to be not as far away, getting a somewhat intimate portrait appearance.

After borrowing a more expensive zoom, which yielded more details, I like this 70-300 mm kit lens even more because it is a light and compact design which lets me actually use this lens from time to time, not only for rare moon shots. When I am in the zoo, this lens is a regular. For events taking place outside, I grab it in order to get candid shots from far away. Facial proportions are not optimal as discussed, but those pics are better than nothing.

Showing off: DX 16-80 mm 2.8-4 VR

Let me begin with the bad stuff: The focus ring has some play. The barrel construction seems to be all plastic (at least, the mount is made of metal.)  And this lens costs almost 1000 bucks! Still, there are only 7 aperture blades, not 9. Autofocus is AF-S, not AF-P, so it is not as quick as it theoretically could be.

The aperture control is ambivalent: Aperture blades are moved electronically, not mechanically, which means the lens is incompatible with older cameras. The F65 can focus but not change aperture (shooting wide open instead.) On the upside, on supported cameras the electronic aperture blade movement could be faster than with a mechanical lever, but I am not sure how big the advantages is, if there is any.

You need a lot more to buy this lens. Taken with 16-80 @60 mm f/5.6

Now the good stuff. Where to begin? Optical quality? I find it impressive. Stopping down helps to crank out a bit more sharpness but I have no worries to use this lens wide open. The minimal focal length is 16 mm, not 18 mm as many other zooms. Does not look like a big difference but when I need those 2 mm for wide angle, it is there for nice wide shots.

80 mm on the long end is not very much, I would prefer some 100 mm, but the images are still so sharp that cropping, while reducing nominal image resolution, still keeps a lot of detail compared to cheap kit travel-zoom lenses used at equivalent zoom.

Aperture. 50 mm is f/3.5, 60-80 mm is f/4. An f-stop number of 4 seems to be almost slow but using it at 80 mm still allows more background blur than 50 mm with f/2.8!

VR works really well, at 16 mm one can try 1/6 or even 1/4 seconds handhold, with a bit of luck the image turns out to be usable.

The lens has three switches (autofocus, VR on/off, VR mode). The autofocus is slower than I am used to from AF-P lenses, but the focus speed is okay for all my applications, including taking photos of moving persons. The very large, angular lenshood creates a cinema-lens appearance.

Taking pictures handheld in almost any light

A D5600 with the 16-80 mm feels like a different camera. Put on a D7500, the camera gets quite heavy and I don’t like it to use it all day, but do so on some occasions. This lens serves me well on travel, Considering the performance I wonder how it could be made so light. It covers a useful zoom range, can be used at dawn, sometimes at night without tripod, and is capable of doing good portraits. The bokeh appearance is nicely soft for a zoom lens.

The 16-80 does not excel at anything in particular, but covers a lot with good results. As I said, almost 1000 bucks, but since putting it up, I never complained about the price again.

Travel light: DX 18-55 mm 3.5-5.6 VR

Because I also wanted a lighter, more compact zoom, I added the infamous kit lens. This time I did not buy the optional bag, but the optional lenshood (which is ugly) and the optional real rear cap (since it comes only with this very cheap excuse of a cap.) My main gripe is the front cap though! Not 52 mm, not 58 mm. Instead 55, a very uncommon size.

If the wide angle setting is used wide open, sharpness suffers horribly. The vignette is also very bad. Stopping down helps. The minimum f-stop number of 3.5 is not practical in my opinion.

Otherwise, the optical performance exceeds my expectation. With the right settings, images turn out nicely sharp. There is a non-VR version of the lens, I am glad that I bought the VR model because it helps with longer handheld exposures in order to get enough light with larger f-stop numbers. One can focus very close, allowing near-macro shots.

Autofocus is AF-P, very quick, with very few misses. The lens weights almost nothing and can be used all day long. But it is not my favorite. First, the locking mechanism. The lens can be retracted, making it quite short. but a button has to be pressed and the zoom ring must be turned to get the lens in a working condition. It is expanded at the wide 18 mm setting, getting smaller until 33 mm, and then extends again up to 55 mm. A simple zoom construction again. Second, everything on the lens feels light in the sense of thin and plasticky.

31 mm f/8 to get more sharpness. Images can be good 🙂

There is a silver-colored ring near the front lens. A golden ring marks some prestige (the 16-80 mm lens has it) but this silver ring seems to be out of place. At least the optical performance is okay as long as one stops down. The 18-55 covers a useful zoom range from wide landscape to head-shoulder portrait.

At the widest setting of 18 mm, this lens faster than the dedicated wide-angle 10-20 mm lens at any setting! Both lenses have to be stopped down though in order to yield acceptable sharpness.

I am someone complaining a lot about weight of camera gear, and the 18-55 is an option to be flexible for almost no carriage. Someone buying a DSLR with this lens will probably look for other lenses to add. It still serves purpose, for example if you ask if you want to get a 35 or 50 mm prime, you can test the corresponding field of view with the 18-55.

Wide angle for little money

I also use it as lightweight wide-angle. There are wide-angle, fast prime lenses, but they cost a lot and weight a lot. Except for action or astro photography, VR compensates for the slow aperture, and you get your wide-angle shots for little money with this entry-level kit lens.

The trap over overthinking

That was the plan: Have the 16-80 (bought together with the D7500) in the middle, with an additional option on each the wide and tele range. Later I added the 18-55 as lightweight standard alternative.

All that planning, and all that money spent, but perfect happiness was not found! I even see the value of superzooms now, like 18-140 or even longer, because that means to cover more range without having to swap. Specialized lenses like superwide or supertele are superuseful in superrare cases.

For some time I used a borrowed 18-105 mm lens. Quite heavy for its reach, acceptable but not outstanding image quality, and the AF-S autofocus is slower than AF-P, and close-up capability is as not good as with the 18-55. At least one gets some real tele.

Slimes attacking my keyboard. Taken with 18-105 mm @70 mm.

The 10-20 mm is a good example of a kit-type DX lens: Lightweight construction, a good price, though mediocre ergonomics and the optical quality is visibly compromised unless noticeably stopped down while the lens is rather slow to begin with. Still, for many applications it is practical. The quick AF-P autofocus and VR are nice, too.

Because the lens is comparatively inexpensive I could afford it and because it is lightweight, I use it when I can instead of keeping it in the shelf. But one has to be clear, this items does not get you the feeling “wow, what a high-quality product”.

Investing in DX

The 16-80 costs as much as the other three lenses combined. The build quality is better but not at pro level. The optical quality is very good in my opinion, but one only gets 16-80 mm focal range. The other lenses together cover 10-300 mm (with a very small gap in-between). Spending a lot of money on a single DX lens is a statement to stay with this sensor size for the time to come.

This lens is clearly made for users who also spent a lot on the DX camera, but I like to put it on the affordable D5600 in order to reduce weight. For high-profile events, I use it on the D7500. Should I upgrade to FX within a couple of years, I might regret this purchase. Until then I let the full-frame users talk about their iso performance and just use my compact, yet powerful DX camera/lens combination.

I have an old Nikkor from the film era, 35-70 mm f/3.3-4.5. Autofocus does not work on D5600 because it relies on a camera motor. The lens is not in the best condition as it makes scratchy noises but it works. DX involves a 1.53x crop, there is no wide angle with this lens on such camera. If used wide open, images are soft with this product. But it is a classic item, mostly made of metal, and using it feels good. Image quality however is not on par with kit lenses of today.

Less talk, more walk

All this time writing this blog post was not spent to be out there, improving my photography.

If you are like me, you might want to blame the lens “If I only have something better, my photo would be better”. But what is more likely: That they sold a bad lens which holds you back, or that after decades of technological improvement any lens today is good enough and it is rather the lack of experience which holds you back?

I found an answer for myself.

Will this lens, or the other one, finally bring happiness? Wrong question.