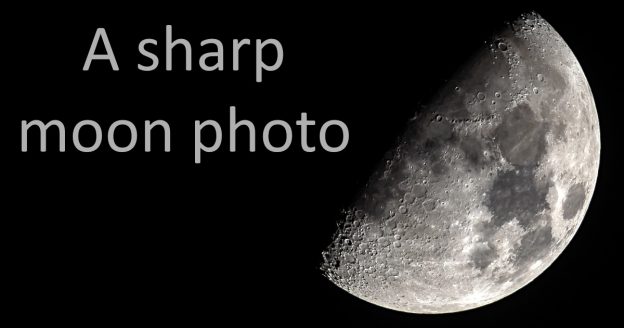
This blog post describes how I got this photo. In order to reproduce, you need your camera and a long tele lens, I also assume you have image editing software able to read Raw files, and to apply common adjustments.
This is the result:

Here is the original Nikon D5600 NEF file. You can download that file and use it as you like except claiming ownership. You can use it commercially if you want as long as you credit me, Arne Seifert, and also link to “http://www.aths.net/a-sharp-moon-photo”.
For the processed images in this article, as all of the Jpeg images in my blog, I claim full copyright. Please don’t use them.
Get experience
The moon is so bright it could be shot handheld if the lens has VR, but we go for the best result. That means, please use a tripod. If the lens has VR, disable it to avoid accidental “correction” when none is needed. I think by now VR is smart enough to not activate accidentally but we are not taking risks here.
On the camera, configure the selftimer. Use a delay of some seconds, and set it to do a couple of shots in succession with some seconds delay in-between.
I also use exposure delay mode, so that after the mirror moved up, the camera waits a bit before releasing the shutter. The vibration caused by mirror motion is thus gone.
Set the camera to full manual exposure including manual iso. For now, begin with 1/100 s, f/10, iso 100. For the Jpeg profile use the flattest you have available. Set the camera to Raw recording (the Jpeg profile still applies to the included Raw preview.) Make sure that when you are reviewing a photo zoomed in, that your camera gets you a full-resolution review even with Raw. Otherwise, use Jpeg+Raw just to get a full-resolution review.
Enable live-view, configure it to shoot on tapping if the camera has a touch screen. Turn the lens to the shortest setting, adjust the camera position until the moon is in the center of the screen. You notice after changing the angle when you then fix the position of the tripod mount, it still moves a bit until it settles down. You have to compensate for that and fix the mount position with the moon a bit higher because during or even after fixing, the camera stills moves a bit. There are tripods available for astronomers which can be oriented with wheels, allowing delicate changes of direction after mounting. But we work with consumer-grade gear.
Now turn the lens to the longest setting.
For focus you have two choices:
- Zoom in via live-view, use autofocus as often as you like until the image appears to be the sharpest. Then switch to manual focus and keep it.
- Use autofocus all the time
The former method gets you consistent results, where for the latter I sometimes get images slightly out of focus. I still recommend the latter, because the earth atmosphere between lens and moon is not static. Warmer air moves up, and because density depends on temperature, mixing air of different temperatures causes changes in how it interacts with light. Using autofocus all the time, you have to live with slight waste because somehow it might not always hit perfectly but overall it adapts to changing conditions. Also you might be outside for a while, with the moon moving on the sky, meaning the thickness of atmosphere changes over the night. Since air interacts with light, if only very little, we can use autofocus to have the camera adapt.
Begin the shooting. Then review the results. The earth turns so fast, the moon will wander to one of the edges. Consider this for the next shooting. Get the moon to a place that during the shooting, it goes through the center of the image. The lens usually gets you the best resolution in the image center.
Very important, please check exposure in the review. You might need to adjust it. If you have a very long lens, you might want to shorten the shutter speed, like to 1/200 s, because the longer the lens, the quicker the moon moves. Compensate shutter speed with iso (in this case, iso 200) instead of aperture. This is because most lenses have their sharpness peak if stopped down. This is especially true for most tele zoom at the long end.
Do all these experiments to learn how you get the best results with your gear. You can also do some basic processing of your images, to see what is possible.
Get the perfect night
When the moon is high it means there is less atmosphere between the moon and the lens. The chance of disturbances is smaller. We don’t photograph a rising or setting moon if we want the best quality. The moon subjectively appears to be larger if close to the horizon but of course the actual size is the same.
We also need night with no clouds. It should be cold, because hot air moves which interferes with image sharpness.
On paper, we want a so-called super moon. Because the circling around the earth is done on an ellipse, the moon is sometimes closer to use than other times. Being closer means a bigger image and thus more details. Super moons are full moons but the full moon has little contrast. This is why I went for a phase. The contrast around the terminator, the day/night border, is always nice, and high contrast helps with the appearance of a sharp shot.
If you do your first moon shooting just at the perfect night, you are likely to overlook something so you get less than optimal results. The result used for this blog was taken with about five shootings worth of experience. First I got experience with my 70-300 mm, when I had the chance to borrow a Tamron 150-600, I could apply all the routine and instantly get some good results.
In each of moon-hunting nights, I took several series of 9 photos each, with re-positioning the camera after each series. Quite some work especially if it is cold outside. But that is the main ingredient of that photo.
Select the photo
You now have a lot of photos looking all alike. Review them in 1:1 zoom to cull the baddies. For the remaining pile, compare if you can delete further images.
For those shootings I used a D5600 (sadly, the live-view broke later in 2019) and a D7500. With the D5600 having more resolution, one would expect more details. But somehow I almost always get clearer, more detailed results with the D7500. Resolution seemingly is not everything.
However the shot used in this blog was made with the D5600, because I don’t want to suggest you should upgrade your camera just to get a little edge for a couple of moon photos. I also don’t go into stacking, that is the use of multiple exposures which are aligned and then averaged for a final image which has more information and therefore allows more post-processing.
First work on the photo
Some, but not all Raw editing tools offer to compensate for lens distortion. For this project I disable it because we don’t want have the image stretched and squeezed, reducing details just to get a slight geometric distortion corrected. I used the automatic color fringe removal though.
First, crop. You want to show the moon, not the empty space. After cropping, adjust brightness levels. First, adjust the white point, that is, stretch the histogram so that white almost but not quite touches the max level. You might also want to adjust the black point. Accept some clipping here, we want to clip the noise in the black.
In order to reveal details in the bright parts, use a function to recover highlights and/or play with the tone curve, that is a curve showing how input brightness translates to output brightness. We are not going for full realism, because to the eye the moon surface is very bright without a lot of texture. We want to use a greater range, that means we show most of the moon in moderate brightness so that we can stretch the image representation over a larger range of brightness levels from medium-grey to white instead of bright-grey to white only.
Do only basic adjustments now, we worry about the final touch-up later. But now would be the time to check if there are color fringes on the edge of the moon. If your program has no automatic correction, you can reduce overall saturation. A more complicated fix is to reduce saturation just for that color fringe hue. or to manually mark the border and then reduce saturation locally in that marked area.
This is what I got now:

Reveal the details
Set sharpness strength to the max and change the kernel size to see how it affect the image, until you get good crater edges. For this example I kept the max strength while using a kernel of 1.1 pixels. I also used a mask threshold of 20%. That means, low-contrast areas get no sharpness applied. They would not benefit much anyway and we don’t want unnecessary noise amplification there.
Now export the image with downscaling. I downscaled the 1342 pixel edges to 1000 pixels. This gets us less pixels but more information for every remaining pixel. This is where at now:

This version is the one we continue to work on. Now we add even more sharpness! I went with max strength again (150%). Kernel size now smaller because we go for the fine details, I used 0.7 pixels. Masking threshold quite high, 59%, to keep the maria clean. A mare, Latin for sea, is a large dark area filled with frozen lava, in earlier times believed to be actually seas.
We can add this extra sharpness without producing too much of artifacts because of the previous downscale. Now I have this:

More adjustments
I now correct the histogram again in order to get more punch, also use a selective saturation slider to get some color amplified. The effect is subtle but you notice that on the right part, one of the dark areas, Mare Tranquillitatis, gets a blue or purple tint. For more oomph I also added filters which add local contrast, that is they adjust the turne curve not just for the whole image and instead check for the surrounding brightness. If something is dark and the surrounding bright, such filter makes the dark area even darker, and vice versa. I added some more sharpness, with the smallest kernel available (here: 0.5 pixels.)
I also then applied noise reduction, masked so that only low-contrast area get denoised. I then manually marked areas of craters in the maria, and locally added more sharpness to have them stand out. Finally I changed overall brightness because why not? The result was posted at the top of the article.
Other ways
There are a couple of commercial tools around, some claim to be AI-based. The ones I tested are not intelligent enough for best automatic settings but when finding good parameters for a given photo, the clean-up-work is good, enhancing details and removing noise at the same time. The primary advantage is that if such tool detects an edge, it seemingly re-draws it with internally higher resolution, which results in great distinct single craters. I used this several times for postings on Facebook.
The downside is high-frequency content. The part of the moon with many overlaying craters get artifacts. I doubt that many ever notice, but having watched the moon through a telescope at different phases, I personally do notice.
A better camera sensor seems to help as well. The D7500, while having lower resolution, gives me clearer detail and less noise. Finally, if you have the time, using a stacking approach to combine similar exposures to a super-image can get you more options for processing and thus more detail as well.
This blog entry shows that even without all that, one can get a detailed depiction of the moon – that is, if one has access to a long lens.